When you map a drive, you’re basically creating a shortcut for that drive on another computer or in another location. In other words, mapping allows you to create a new drive letter for a folder, giving you access to it just like other computer drives. Many people map their folders when they want permanent access to a folder on another computer, network, or server. Unfortunately, mapped drives don’t always work the way we want them to and some people may run into the issue of a mapped network drive that is not showing. When the drive isn’t showing, you obviously can’t open and work on it. The good news? There are a few different ways to resolve this issue. Today we’ll help teach you how to fix mapped network drive not showing in Windows 10/8/7.
Solution 1: Fix Mapped Network Drive Not Showing in File Explorer in Windows 10/8/7
If your application is running with admin rights, you may not be able to see it on your mapped drives. Here’s how to get around this:
Step 1. Click on “Start” and in the program box type in “regedit”. Click Enter.
Step 2. Find this sub-key : “HKEY_LOCAL_MACHINE\SOFTWARE\Microsoft\Windows\CurrentVersion\Policies\System” and right click it.
Step 3. Select “new” and click “DWORD value”.
Step 4. Type in “EnableLinkedConnections”. Press Enter.
Step 5. Select “EnableLinkedConnections” and right click. Choose “modify”.
Step 6. Type “1” into the value box. Click OK.
Step 7. Exit and restart your computer.
Solution 2: Fix Mapped Network Drive Not Showing All Files/Folders in Windows 10/8/7
Sometimes files, folders, and subfolders in Windows can be hidden. When this happens, users cannot see them at all, even when they go to select the appropriate drive letter. This is what happens when files or folders are hidden on the NAS drives, and it can easily happen to mapped network drives. Here’s how to unhide your mapped network drives:
In Windows 10/8:
Step 1. Open File Explorer.
Step 2. Click on the “view” tab.
Step 3. Click on the box next to “Hidden items”.
In Windows 7:
Step 1. Open File Explorer.
Step 2. Select the “Organize” tab.
Step 3. Select “Folder and search options”.
Step 4. Click on “view” tab.
Step 5. Choose “hidden files and folders” > “Show hidden files, folders, and drives” and click OK.
Once you have finished this process, all hidden drives, folders, and files should appear in their original location.
Solution 3: Recover Hidden Files when Mapped Network Drive Not Showing
If you have tried to learn how to fix mapped network drive not showing in Windows 10/8/7, but have not had any success with the methods listed above, there is a third solution that is more likely to work. It’s called AnyRecover.
1,000,000 + Downloads
Features of iMyFone AnyRecover:
Recover your data from a variety of different places including hard-drives, computers, USB and external sources, email accounts, and mapped network drives.
Search down deep into the soul of your sources to recover data, files, and folders that you may have thought were deleted forever.
Provide you with easy, simple to follow instructions that can help you recover your files, folders, and data in minutes.
Provide you with the assurance that all of your data and information is kept 100% safe and secure.
Recover data from over 1000 different source types including pictures, videos, emails, documents, and archives (to name a few).
Here’s how to use it to restore your files when network drive not showing up in Windows:
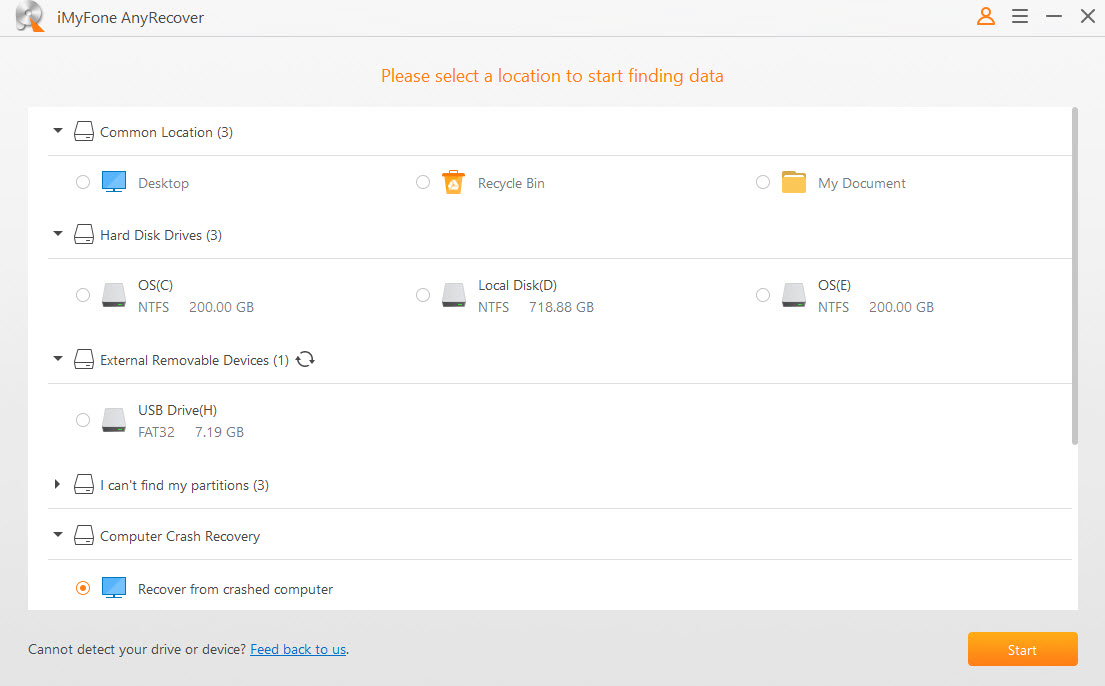
Step 1. Download and run AnyRecover software and select the network drive that you would like to restore files from.
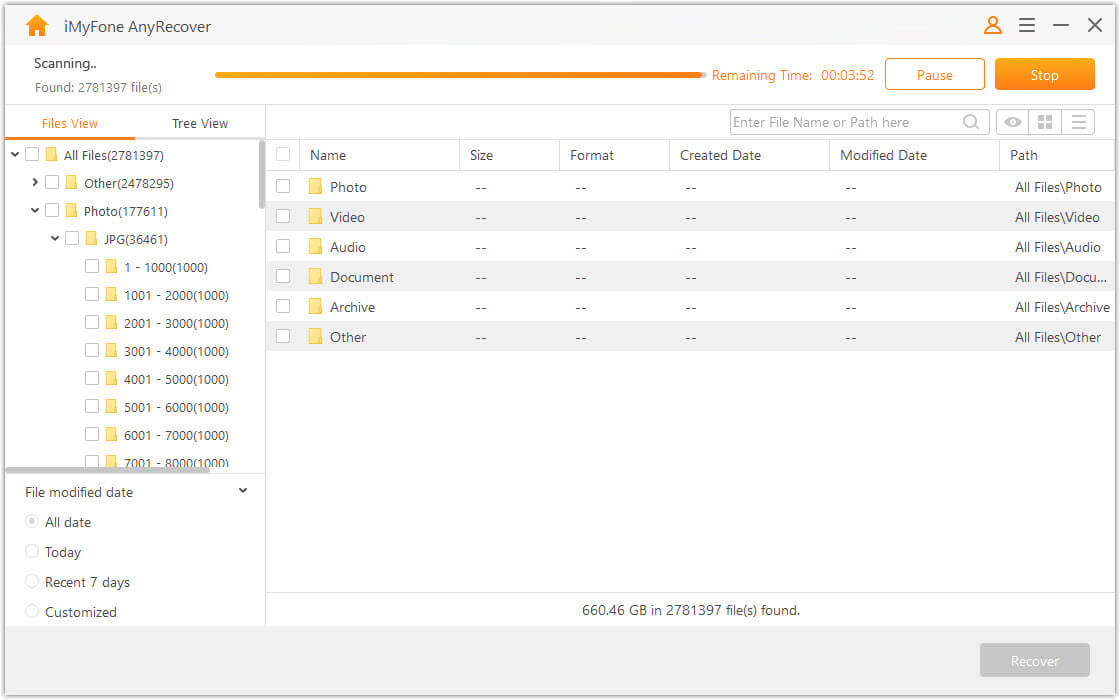
Step 2. After selecting the location you want to recover lost data, hit “Start” button. The program will start to scan for your deleted, missing, or hidden files.
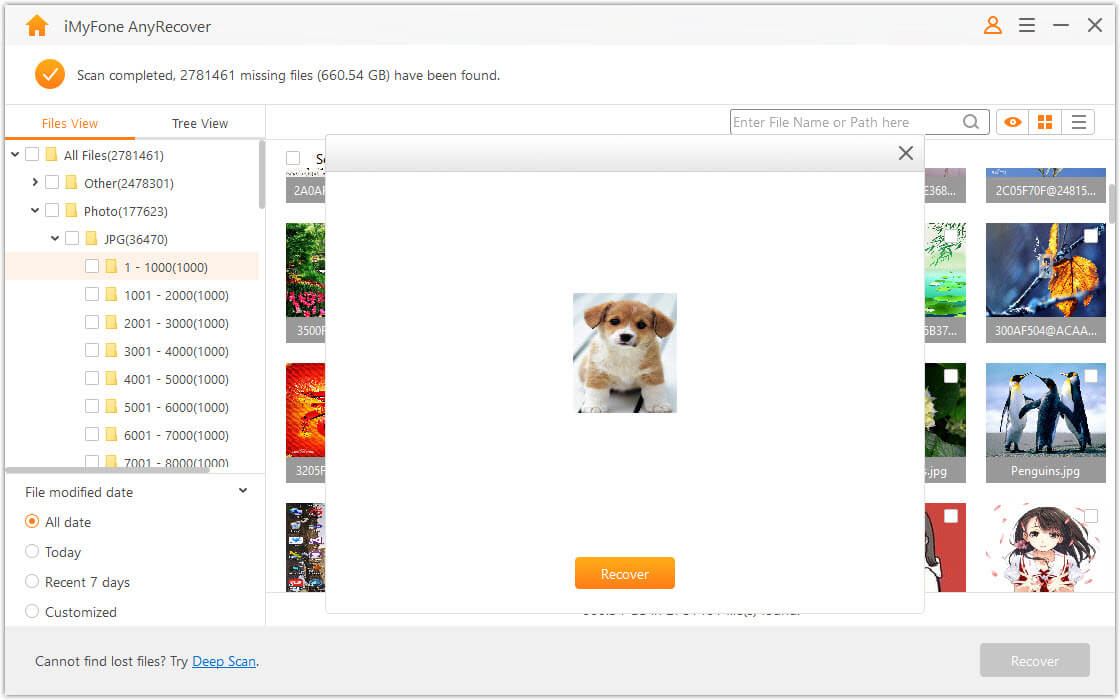
Step 3. Once finished scanning you will see a list of all your recovered files, folders, and documents. If you wish, you can preview them within the program. Select the files that you would like to restore and then click “recover” and save them to a different hard disk (aside from the original location).
And it’s that simple! In 3 easy steps you can use AnyRecover to recover your missing, hidden, or deleted files from your mapped drives.
Conclusion
If you are having a problem finding your mapped network drives, you may need to learn how to fix mapped network drive not showing in Windows 10/8/7. The first step is to try one of the first two methods listed above. If these do not work, or if you are not comfortable with following the steps, you can also try the third option – AnyRecover. AnyRecover has an extremely high success rate when it comes to recovering data, even after it has been “permanently” deleted.
If the network connection type is set to Public, enabling PowerShell remoting might fail because by default, PowerShell expects domain or private connection types.
If you try to enable PowerShell remoting on a PowerShell console with Enable-PSRemoting ‑Force, you will sometimes receive the error message below:
Set-WSManQuickConfig : … WinRM firewall exception will not work since one of the network connection types on this machine is set to Public. Change the network connection type to either Domain or Private and try again. … The reason is that the computer will allow connections with other devices in the same network if the network connection type is Public. Microsoft considers it as a security risk if you enable PowerShell remoting in a Public network.
You can verify your current connection type settings in the Control Panel: Control Panel\Network and Internet\Network and Sharing Center
Viewing networking connection type in the Control Panel
You can also check your profile settings with the PowerShell cmdlet Get-NetConnectionProfile. The NetworkCategory property corresponds to the network connection type.
Displaying the network connection type with PowerShell
This problem can even occur if your computer is an Active Directory member. If you’ve previously signed on to the member machine, Windows will cache your credentials, and you can log on without an available domain controller. In that case, Windows will automatically set your connection type to Public.
If a domain controller has authenticated you, it will set the network category to DomainAuthenticated:
In this case, PowerShell won’t throw an error if you enable remoting. However, if a domain controller hasn’t authenticated your computer, you have two options.
With the SkipNetworkProfileCheck parameter, you can just ignore the warning:
1
Enable-PSRemoting -SkipNetworkProfileCheck -Force
The Force parameter avoids the confirmation prompt.
Using the SkipNetworkProfileCheck parameter
Changing the network connection type with PowerShell ^
However, this option poses a security risk because Windows enables network discovery features for your computer. Thus, it is better to change the connection type manually to Private:
1
Set-NetConnectionProfile -NetworkCategory Private
Changing the network connection type to private
Notice that you can’t set the NetworkCategory property to DomainAuthenticated. If you try, PowerShell will return an error:
Set-NetConnectionProfile : Unable to set NetworkCategory to ‘DomainAuthenticated’. This NetworkCategory type will be set automatically when authenticated to a domain network.
If you’ve ever found yourself right-clicking on something and wondering where all that junk came from, you’re not alone. Want to get rid of the cruft you don’t use, and add some actually useful items to the context menu? You can.
Windows includes a bunch of options in that context menu by default, and that list grows as you install more apps. It sometimes seems like every app is fighting for a piece of your context menu and most of us don’t even use half of them. We’re going to show you how you can remove items by editing your Registry, as well as an easier cleanup method using a couple of free third-party apps. We’ll also point you toward how to add some more useful commands. Without too much effort, you can take your context menu from being cluttered and only mostly useful…
…to being streamlined and efficient.
Let’s get started.
The Hard Way: Remove Items from the Context Menu by Editing the Registry
If you want to clean things up the truly geeky way, you can do from Registry Editor without the need for third-party software. We’ll get to the easier tools a bit later, but we think it helps when using those tools to understand how this stuff is handled in the Registry.
Standard warning: Registry Editor is a powerful tool and misusing it can render your system unstable or even inoperable. If you’ve never worked with it before, consider reading about how to use the Registry Editor before you get started. And definitely back up the Registry (and your computer!) before making changes. This is especially true when following the guidelines in this article, because you’ll end up having to do a little hunting around to find the context menu entries that mean something to you.
Open the Registry Editor by hitting Start and typing “regedit.” Press Enter to open Registry Editor and then give it permission to make changes to your PC.
ADVERTISEMENT
Unfortunately, the items populating your context menu are not all located in the same place in the Registry. You can find most of the context menu items used for both files and folders by drilling down to one of the following keys in the navigation pane on the left:
HKEY_CLASSES_ROOT\*\shell
HKEY_CLASSES_ROOT\*\shellex\ContextMenuHandlers
HKEY_CLASSES_ROOT\AllFileSystemObjects\ShellEx
You’ll find context menu items specific to just folders in one of these keys instead:
You’ll need to handle the context menu items found in these locations a bit differently, so keep reading and we’ll explain how. For now, you might find it handy to locate each of those locations in the Registry and add them to your favorites list so that they’re easier to browse through later.
Remove “Shell” Items
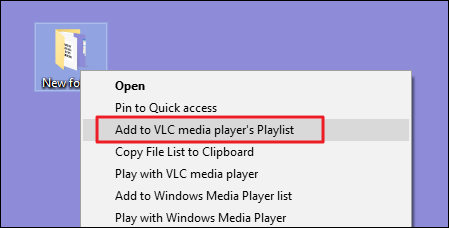
Let’s take a look at one item as an example. I use the VLC video player. When I installed it, VLC added a context menu item named “Add to VLC media player’s Playlist.” I never use that and would rather it not be on my context menu.
Here’s how we get rid of that menu item. In Registry Editor, drill down to the following key:
I spotted the AddtoPlaylistVLC key while browsing through the shell key looking for items to remove. Items under the regular shell key are usually really easy to spot and deal with.
ADVERTISEMENT
We have a few options on how to handle this. We could just delete that AddToPlaylistVLC key entirely, and that would remove the item from the context menu. However, unless you back up your Registry—or export the key first and keep up with the REG file—it won’t be easy to get back if you change your mind.
The second option is to disable the key instead of deleting it. To do that, just right-click the AddToPlaylistVLC key—or whatever key you’re working with—and choose New > String Value. Name the new string value “LegacyDisable.”
As soon as you create the LegacyDisable value, the change should be immediate. Right-click a file or folder in File Explorer and we can see that the “Add to VLC media player’s Playlist” item has been removed from the context menu.
You also have a third option. If you occasionally use a menu item, but don’t want it cluttering up your regular context menu, you can hide it away on the extended context menu you see only when you hold Shift while right-clicking a file or folder. To do this, right-click the AddToPlaylistVLC key—or whatever key you’re working with—and choose New > String Value. Name the new string value “Extended.”
Now, it will only appear if you right-click on a folder while holding Shift.
Remove “Shellex” Items
You probably noticed that some of the common Registry keys we listed at the top of this section have “shellex” (Shell Extension) in the name instead of just “shell”. You’ll need to handle those types of keys just a bit differently. As our example, we’ll head down to one of those keys we mentioned:
The shellex items will be a little tougher to decipher, but you can usually figure out an item by the key name on the left. Here, we’re going to be working with the DropboxExt key inside the ContextMenuHandlers key.
When Dropbox is installed, it adds a “Move to Dropbox” command to the context menu. Because I’m more of a drag and dropper, I’ve never once used that command, and I’m going to get rid of it.
You can’t use the tricks with the LegacyDisable and Extended string values we described above with shellex items. You could still delete the whole DropboxExt key to remove it from the context menu (and be sure to back the key up if you do), but there is a simple way to disable it. Just select the key on the left and then double-click the (Default) value inside that key to open its properties window.
On the properties window, in the “Value data” box, just modify the value that’s already there by putting a few dashes in front of it, being careful not to delete any of the existing value. That way, if you change your mind, you can just go back in and remove the dashes. When you’re done, click “OK.”
The change will be immediate, so go right-click something in File Explorer and make sure the command is gone.
Unfortunately, when it comes to shellex items, there’s no way to hide them on the Extended context menu the way you can with shell items. You can only delete or disable them.
Explore Other Locations by File Type
If you want to remove context menu items that you only see when you right-click specific types of files, you can do that, too. These items are stored elswhere than the common locations we’ve already looked at. To find them, you’ll need to first locate the file extension key by looking under HKEY_CLASSES_ROOT for that extension, which in turn will tell you the name of the key that you need to look for.ADVERTISEMENT
Just as an example, say you wanted to remove the menu item for opening an Excel document (XLSX) in Excel when you right-click on it. Why would you want to do this? Well, you probably wouldn’t, but it’s an easy example to look at here. Other applications may add different types of commands you don’t need.
You’d start by taking a look at the following Registry key for the XLSX extension:
HKEY_CLASSES_ROOT\.xlsx
The data column for the (Default) shell key lets you know that the actual type of file is “Excel.Sheet.12.”
Now, you can browse to that extensions key:
HKEY_CLASSES_ROOT\Excel.Sheet.12\shell
And now that you’ve located the correct shell key, you can use the same techniques we described in the previous section on “shell” items to delete, disable, or hide the item on the Extended context menu. Remember the LegacyDisable and Extended string values? Yep, those work here, too.
The Easy Way: Remove Items from the Context Menu with NirSoft Utilities
So, now that you know how to do things the hard way, let’s take a look at the easy way. Instead of editing the Registry, you can download two tools from NirSoft to clean up your context menu. Why two tools? Because one of them handles regular shell items and one handles shellex items. They are both much easier to use than editing the Registry, but the behind-the-scenes understanding of how these things are handled in the Registry will give you a leg up in sorting through all the items these tools display.
Start by downloading both the tools. The first tool is ShellMenuView, which handles regular shell items. The second tool is ShellExView, which handles shellex items. Scroll down toward the bottom of both those pages to find the download links. The tools both work with pretty much any version of Windows from 98 all the way through 10. You will need to grab either the 32-bit or 64-bit version, depending on whether you’re running a 32-bit or 64-bit edition of Windows.ADVERTISEMENT
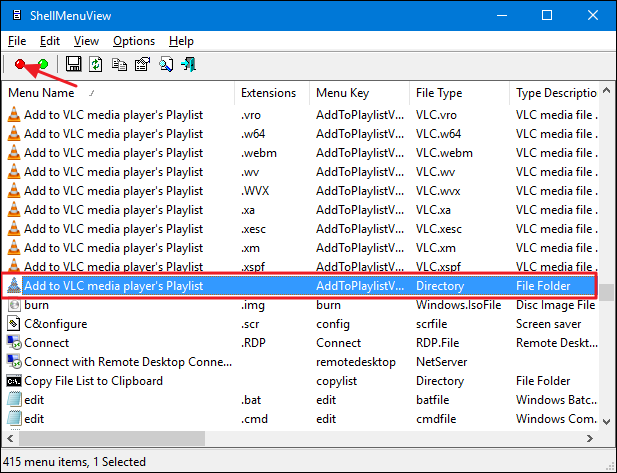
The first tool we’ll check out is ShellMenuView, which allows us to manage all of those regular shell items with an easy to use interface. After downloading and extracting the tool, double-click the EXE file to run it. It’s a portable tool, so there’s no installation.
In the ShellMenuView window, just browse down the list until you find the item you want to disable. You can only disable items with these tools—not delete them or hide them on the Extended context menu. And by the way, these tools disable items by creating a LegacyDisable string value inside the appropriate key—just like we did when we edited the Registry manually.
When you find the item you’re looking for, click the “Disable” button on the toolbar (the red light).
Another benefit of using these tools is that you can select multiple items and then disable them all at once. In our example, we’re disabling the “Add to VLC media player’s Playlist” item only when you right-click a folder (the same example we used in the Registry section previously), but we could easily select all of the “Add to VLC media player’s Playlist” items and then click “Disable” to remove that command from the context menu of all supported file types as well.ADVERTISEMENT
When you’re done removing shell items, the next step is to fire up the ShellExView tool and remove shellex items. This one works the exactly the same way as the first tool. Just select one or more items and then click the “Disable” button to remove the items from your context menu.
How to Remove Additional Items from the Context Menu
There are a couple of context menu items you may have noticed that neither the NirSoft tools nor the regular Registry methods we covered address: namely, the items you find on the “Open With” and “Send To” submenus.
The “Open With” menu is a handy feature when you open files with multiple programs. Whenever you open a file with a particular program, that program gets added to the “Open With” menu for that type of file. If you’ve ever accidentally opened a file with the wrong program or with a program you don’t use any more, though, you’ve probably seen that menu get cluttered over time. Fortunately, we have a complete set of instructions to guide you through removing programs from the “Open With” menu.
The “Send To” menu is one of those features that people tend to either love and use all the time or just never even bother with. When you install Windows, some items are added to the “Send To” menu by default. Others get added over time as you install different apps. If you’ve ever wished you could declutter that menu, it’s your lucky day! We’ve got one guide for customizing the items on the “Send To” menu and another guide if you’d like to remove the “Send To” menu from your context menu altogether.
Now that you’ve spent some time removing items you don’t need from your context menu, you can turn your attention to adding some items you might actually use. To start with, you can actually add just about any application or shortcut you want to the context menu. Since you’ve now read all about what Registry keys to look through when you’re removing stuff, you won’t be suprised that adding things involves a lot of those same keys.
Of course, we wouldn’t leave you without any specific suggestions for fun things to add to your context menu. And we’ve covered a bunch of them. For example, you could add any of the following to your menu: